How to start a blog from zero to hero
It’s not easy to be a blogger. From the outside, it looks like a piece of cake, these amazing people making 6 figures like a flick of a wand.
I wish it could be like that, but there is much hard work if you want to make money blogging.
This post is the piece of cake. How to start a blog from zero to hero!
1 | Choosing a name for your blog
Be broad in the beginning, like one of my clients, Cassie. Her blog Little Time to Read Today is about lifestyle and everything that’s including in the lack of time to read because she is doing a lot of other stuff (like working, cooking, etc).
After writing lots of blog posts you will figure out which ones are converting more, so you can narrow down.
Here are some ideas on how to find a name for your blog:
- The + Color + favorite thing (The purple book, The yellow elephant, The pink beer, etc)
- The + gender + who + verb (The girl who paints, The guy who cooks, etc)
- Your name (if you’re a coach blogger, go for this one)
- Just + your name or your niche (JustMaria or JustKitchen)
- A wordplay ( the name of my studio comes from the obvious “very nice”, you think? It actually came from the name Berenice, a Magikarp)
2 | Buying the domain for your blog
Do you want to be a serious blogger? You have to look professional! So you have to spend money to make money.
Keep in mind that .com and .net are the most expensive ones. Mine is .ca because I am in Canada and I target mostly Canadians (you must live in Canada to get a .ca)
Cassie from Little Time to Read Today (https://littletimetoread.today/) got a .today and I found that genius. She told me she got a sweet deal on the .today and you can think about that too. Not so common extensions are the cheapest.
When was it the last time you wrote a website address on the search bar? Chances are you clicked on a link somewhere, on Pinterest for example. Just take something easy to remember and that doesn’t hurt your pocket.
You can use Namecheap to find the best domain for you. Or GoDaddy.
Attention! Only buy the domain on this websites. Their hosting is not good.
3 | Renting a space for your blog
Yes, yes, told ya, it wasn’t cheap to start. Now that you have a name for your blog, you got the domain, you must find the best house for your blog. It’s like real estate, you’re going to ask around what is the best area to live, then you’re going to rent and pay by month. This is the hosting.
As you want to make money with your blog, I suggest you use a 3rd party hosting to add a wordpress.org website. Wix, wordpress.com, squarespace are all nice and pretty but you’re using their space, you’re renting a room, so you have to follow the rules of the house.
If you start to sell something they don’t like, they’re going to shut your site down. No money back, no backup. When you install WordPress.org Content Management System (CMS) on the hosting you chose, you are renting the house and you make the rules.
The reason I said to not take GoDaddy or NameCheap as your hosting is because I try them before and they are not the best. You get a sweet deal on the first year and you get bankrupt on the second one. Who wants that? And GoDaddy makes your website so slow, I can’t even think about it without having an anxiety attack. But I have 3 domains registered with GoDaddy and I am totally fine with this service.
The best hosting company is SiteGround (with this link you get 60% off).
I didn’t have to do anything, the customer service transferred my website from GoDaddy so fast and so smooth that I refer them to everyone. And they always help you with a chat box. 😍🤩
Another thing important for a website is the HTTPS (otherwise you are going to be flagged as insecure by Google) and they have it for free. Just pop the chat and ask them to install “Let’s encrypt” on your website. Done!
A DIY blog can be Overwhelming.
Sometimes you just need a little help.
You can just sit down and write your content while I take care of the technical stuff.
4 | Installing WordPress.org
hahaha
I will teach you how to do it if you’re not feeling that lazy.
Most of the hostings have an area called CPANEL. Go there.
Usually, on the 2nd or 3rd row, it would an area called auto-installers. Sometimes there is a Kanguru named Zacky Installer, it really depends, so you click on Zacky Installer and choose WordPress. If you see a list like this, just click on the WordPress icon and follow the instructions.
Stuff that you will need to choose. The destination where your blog will be installed, leave it blank, so people don’t have to type “blog” to go to your blog.
Enter the title of your website in the area that asks for it, you can change this later. Just keep in mind the SEO. Write the name of your blog and what is about on the Title area: “Berry Nice Studio – Affordable Websites for Canadian Entrepreneurs”.
Choose your administrator credentials. This is very important! DO NOT CHOOSE YOUR USERNAME AS ADMIN! I know it’s there already, it’s a suggestion but it’s so obvious that people will try to hack your website. It can be your name, your pet name or whatever you want. It’s for your eyes only. Also please, choose a strong password.
After that, click install.
5 | Choose a theme for your blog
WordPress comes with a few themes that are A-ok to start. But it’s like moving in without painting the house. It’s much easier to do it now that you have no furniture inside than later…
So, how to choose a theme? I would tell you to use Divi, but I know how expensive Divi is. It’s the best, in my opinion, it’s what I use and my blogger package comes with Divi (no extra charge).
But, if you want to try a lot of WordPress themes to choose the best one, instead of looking for a free one, just go to Envato Elements, sign up for a month and cancel before the end of the month. It costs $16.50 per month and you can download everything you need, not just themes. Click here to go to the themes page.
If you want a super cheap theme that comes with WPBakery (former Visual Composer) here it is The 7 Theme – super customizable. I tested and used this theme in 4 websites for 2 years.
Another way to find a theme you like, just go to a blog that you love and if they are using WordPress, copy and paste their address in this link: https://whatwpthemeisthat.com. Then, you can start from somewhere. And don’t worry about copying the theme because so many people using the same themes all the time. It’s the way you customize it that makes it unique.
Download the theme you want to try, it comes in a zip file (don’t unzip)
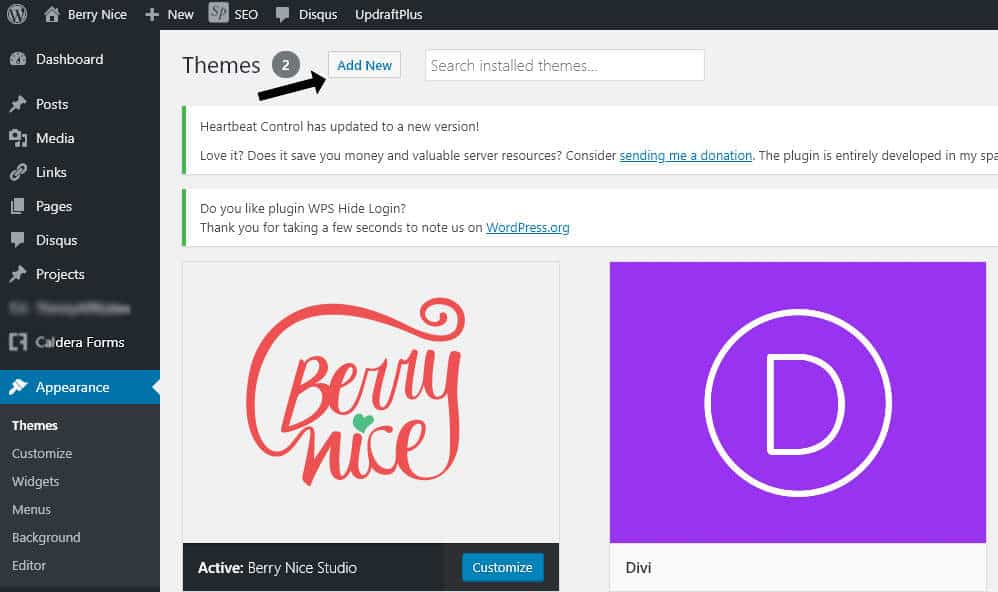
To install a theme is very simple, just go to your admin area at WordPress
Then go to Appearance >> Themes >> Add New

6 | Settings
General
Here you are going to change your site title, the tagline (make sure the tagline speaks with your niche like “A blog to help Moms to thrive online”), the date format, time format, and when the week starts.
Discussion
Here you are going to set up the comment section. Avatars, who can comments, banning words and users, IPs, etc.
Permalinks
Choose Post name and save changes.
7 | Creating content
Don’t think too much on the about page. It’s basically an intro about you and how can you help other people with your blog. A paragraph is enough for now. You’re just starting and you don’t need the About page to be a huge boulder on your road. You can change it when you have time.
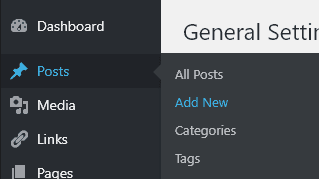
To add a post, click in Posts >> Add New
There is a white bar on the top for the title of the posts and a huge rectangle for the actual post. If you ever used a text editor in your life is not much different.
Now it’s time to write the posts. Keep in mind that you will need at least 1200 words to make a valuable one. To save and continue later, click on Save Draft.
To put an image on your post, roll down and click on Set Featured Image (this image will be your blog cover).
When your blog post is ready, click publish and then view post.
That’s it! You’re a blogger now. All you need to do is keep going! Don’t give up like most people do! Thrive!


